


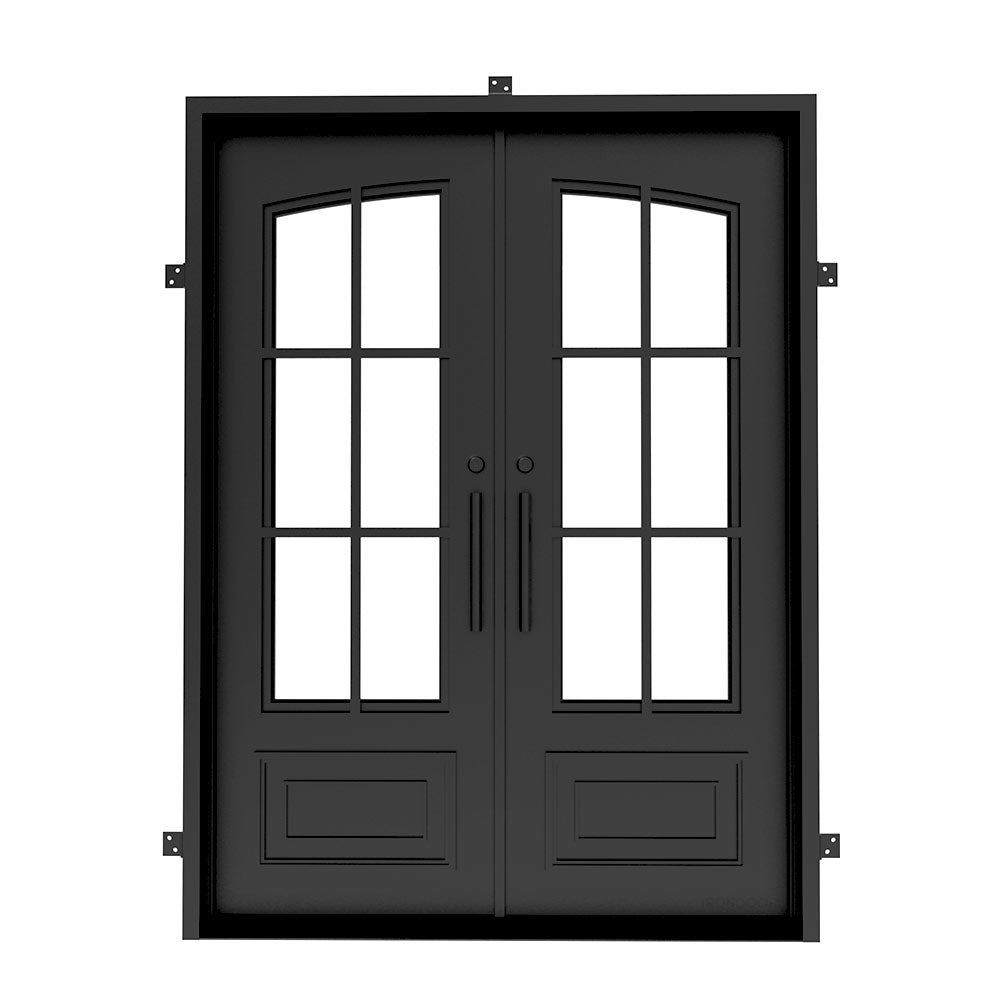
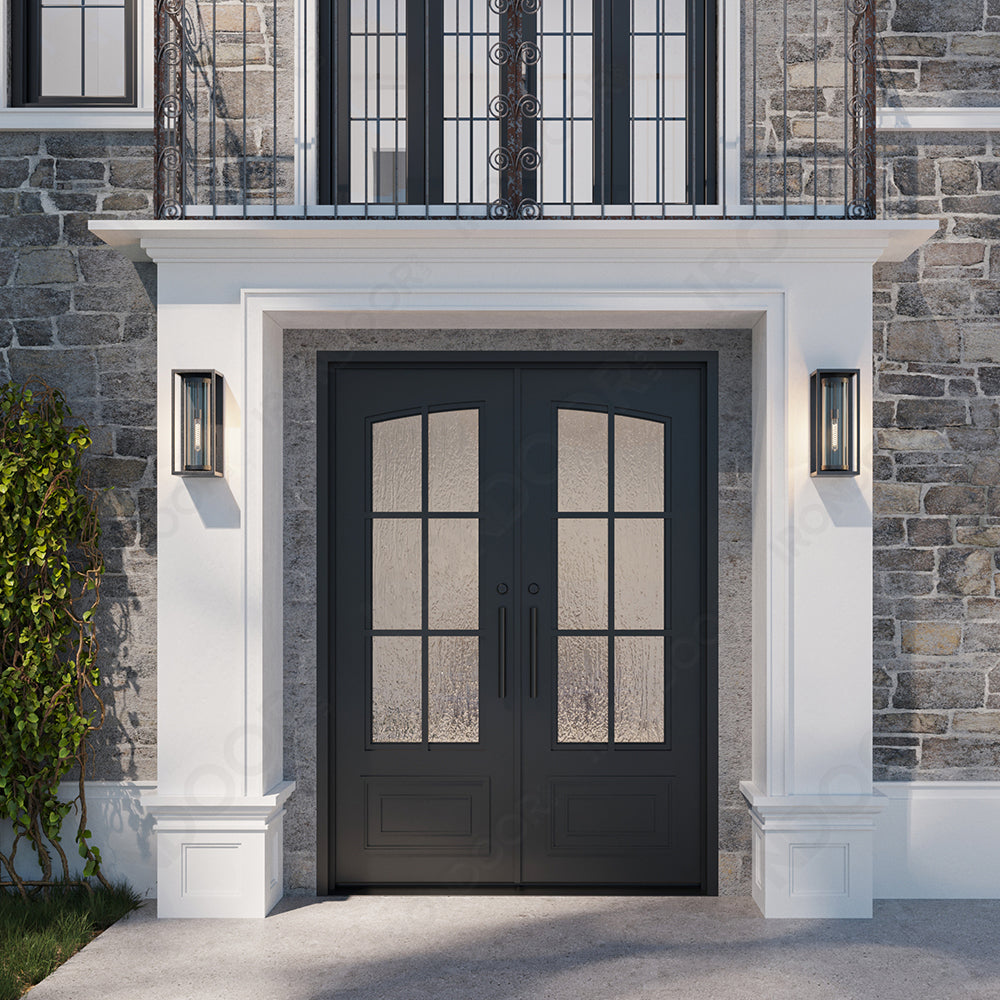


Biltmore 23 Black Exterior Double Wrought Iron Door with Eyebrow Top
Biltmore 23 Black Exterior Double Wrought Iron Door with Eyebrow Top
1 in stock (Ships within 4 Days)
Which Way Does It Swing?
- Single Doors -
From standing outside looking into the room.
 |
 |
 |
 |
- Double Doors -
From standing outside looking into the room.
 |
 |
 |
 |
Couldn't load pickup availability
Share this product
📐How to Measure Your Exterior Door
Accurate measurements are crucial when ordering a new iron door to guarantee a flawless fit. Our step-by-step guide makes measuring easy, helping you avoid installation issues. Whether you're replacing an existing door or installing a new one, follow these simple instructions to ensure the perfect fit for your pre-hung or slab iron door.
Tools You’ll Need:
- Measuring tape (preferably metal for precision)
- Paper and pen or phone (to note measurements)
- Ladder (if measuring a tall entryway)
- Level (to check alignment)
All doors from IronDoor.com come with a Pre-Welded Jamb ready for installation. No jamb assembly is required on-site, ensuring a precise fit and greater structural integrity.
* The door featured here is an 72" x 96" Openair 23 Double French Steel Door.

The recommended rough opening for this door is 73" x 96.5", allowing space for adjustments to ensure a precise fit. You typically want to make sure your rough opening is 1/2" taller and 1" wider than the door.
Conclusion
Properly measuring your door ensures a perfect fit and smoother installation. If you’re unsure about your measurements, consider hiring a professional or consulting with your door manufacturer. Iron doors are heavy and require precision, so it’s essential to get it right the first time!
🛠️ Exterior Door Installation Guide
IronDoor.com doors include the following pre-installed accessories, ensuring a smooth and hassle-free installation:
- Tempered Glass (Operable if applicable)
- Bullet Hinges
- Threshold
- Operable Glass Hardware (if applicable)
- Roller Catches
- Stylish Matching Deadbolt (for a Perfect Finish)
- T-Astragal (for double doors)
- Reinforced Heavy-Duty Mounting Tabs
- Weather Stripping
- Door Sweep
This ensures a hassle-free setup, making the install easier for your installer.
Let's Get Started!
⏳ Time Required: Installation typically takes 2-3 hours. We highly recommend hiring a professional installer with experience in iron doors for the best results. However, some of our customers successfully install their doors on their own.
⚠️ Note: If using a razor knife, be extra careful to avoid accidentally cutting into the door or jamb.

Step 1: Move the Crate to the Setup Location
Our iron doors are extremely durable and heavy, so for a safe and smooth installation, we recommend:
- Single Door: 2 people for handling
-
Double Door: 3 people for handling
- Pivot Door: 4 people for handling
Take your time and lift carefully to avoid injury!
Step 2: Check Rough-Opening Measurements
Before unboxing the door crate, measure your rough opening to ensure it is:
- 1" wider than your new door
- At least 0.5" taller than your new door
📄 You can find your door size on your receipt. Double-checking these measurements ensures a perfect fit!
Step 3: Inspect & Unbox Door Panels
- Inspect the crate for any damage. If you notice any issues, take photos 📸 before unboxing.
- Unbox the door panels with the glass side facing up 🪟. The CAD drawing will be on the same side as the glass.
- Check the door panel for any damage once it's unboxed.
🛠️ Handling Operable Glass
- If your door has operable glass, it's best to remove the glass before installation to prevent damage and make the door lighter.
- Open the glass panel to a 90-degree angle, then slide the glass towards the top of the door to remove it.
- Protect the glass and place it in a safe location.
🚨 If you notice any damage:
📷 Take photos immediately and submit them within 24 hours for warranty coverage.
If the crate was damaged during shipping and caused damage to the door, it may be covered by the shipper's insurance.
Step 4: Inspect & Unwrap Jamb
The jamb is the frame of the door and will come wrapped in bubble wrap and cardboard. Carefully open and inspect for damage. If any damage submit it to us within 24 hours.
Step 5: Install Jamb In Rough Opening
Center the jamb in the opening and level the threshold while making sure the sides also stay level. If necessary, remove any drywall to ensure a direct and secure connection to the framing stud. Use composite shims if needed for leveling.
⚠️ Note: Make sure the jamb is 100% level on all sides to ensure proper fit and functionality. Starting with the jamb level and square is just the beginning. Subsequent adjustments are common with iron doors, which may sometimes need slight deviations from level, plumb, and square conditions to fit properly.
Step 6: Secure Jamb with Bolts
Once the jamb is completely level and room for adjustment on the sides, secure it to the framing by bolting the top installation tab directly to the top header. It's best to leave the side bolts off until after the door panels are installed to allow movement to align door panels perfectly.
Step 7: Install Door Panels
Before installing the door panels on the hinges first grease the hole making sure the ball bearing is in it also placing a thin layer of grease on the hinge peg on the jamb.
- If installing a double door install the nonactive door first.
- If you have operable glass panels it's best to remove the glass before installation.
Install the door panel while it is open at a 90-degree angle from the closed position. With the help of 2-3 people and a pry bar to lift from the bottom, carefully lift the door and slowly lower it onto the hinges once properly aligned.
Close the door and lock into place with flushbolt for double or deadbolt for single. Make sure everything feels and operates smooth. If the door doesn't shut properly check if it's level and properly aligned.
🔄 Repeat step 7 if installing a double door.
Once the door(s) open and close smoothly, and the gaps are even from top to bottom, secure the jamb by tightening the side installation bolts.
If applicable, you can now reinsert the glass into the operable panels.
Step 8: Roller Catch Adjustment
Each door panel is equipped with two adjustable roller catches, located at the top and bottom. You can fine-tune these using a Phillips screwdriver to achieve your desired level of closure for a secure and smooth fit.
Step 9: Install Handles
You're Almost There! 🎉
For a seamless and hassle-free installation, the deadbolt comes pre-installed, so the only step left is attaching the handle.
Easy Handle Installation:
- Use an Allen wrench to separate the handles.
- Align the mounting screw with the pre-drilled holes in the door panel.
- Secure the handle by tightening the Allen bolt on the side.
Step 10: Clean & Enjoy
Gently clean the door using a mixture of mild dish soap and water. Use a soft microfiber cloth to wipe down the surface, ensuring a streak-free and scratch-free finish.
Enjoy your new iron door, designed for both beauty and security! 🚪✨
Specifications
Make a Lasting First Impression!
Elevate Your Home with Stunning, Handcrafted Iron Doors Designed for Unmatched Security, Lasting Durability, and Timeless Elegance.

Heavy-Duty Bullet Hinges
Premium Heavy-Duty Bullet hinges with Zerk Fittings for Easy Greasing.
- Built for exceptional strength and longevity.
- Withstands the weight of heavy iron doors without compromising functionality.

Pre-Installed Roller Catches
Adjustable top and bottom roller catches allow smooth opening.
- Easily Adjustable Tension: Customize the catch strength for a perfect fit and smooth operation
- Built with high-quality materials to withstand heavy use and maintain performance.

Premium Craftsmanship
Constructed with premium 12-gauge steel for exceptional strength, durability, and longevity.
- Professionally welded joints for a smooth, flawless finish and superior structural integrity.
- Incorporates precision-engineered components like bullet hinges and roller catches for seamless operation.

5/8" Dual-Pane Glass
Enhances insulation, improving energy efficiency while providing added durability.
- Tempered for Safety: Engineered to shatter into small, blunt pieces if broken, minimizing the risk of injury
- Weatherproof Seal: Helps prevent drafts, moisture, and noise, ensuring year-round comfort.

Operable Glass
Built-to-last hardware with operable glass for versatility and style.
- Enhanced Ventilation: Allows fresh air to circulate while keeping the door securely closed.
- Easy Cleaning Access: Opens inward for convenient cleaning of both sides of the glass.

Pre-Installed Door Sweep
Bottom door sweep is designed for a secure, airtight seal.
- Airtight Seal: Prevents drafts, dust, and insects from entering, ensuring a more comfortable indoor environment.
- Weatherproof Barrier: Keeps out rain and moisture, enhancing the door's weather resistance.

Threshold & Jamb
6" Sloped Steel Threshold Seamlessly Integrated into the Jamb for Unmatched Durability and Weatherproof Protection.
- 6" Steel jamb is injected with Polyurethane insulating foam.
- Custom built to support weight of doors.

Weatherproofing
Heavy-Duty Kerf Weather-Stripping for Superior Airtight Seals and Weather Protection.
- Vinyl clad weather stripping around doors.
- T-astragal Stripping: This is a vertical strip placed on one side of a double door (usually the inactive door) to cover the gap between the two doors when they are closed, enhancing the seal.

Durable Install Tabs
12 gauge steel mounting tabs welded to the 6" steel Jamb for easy installation.
- Engineered for superior strength and longevity.
- Simplifies the installation process, saving time and effort.

Flush Bolts
Top and bottom flush bolts provide secure locking for stationary doors, ensuring enhanced security and stability
- Flush-mounted for a sleek, low-profile look that complements the door’s aesthetics.
- Built from premium materials to withstand daily use and resist wear over time.

Insulation
Our iron door jambs are reinforced with injected polyurethane foam to enhance insulation, strength, and noise reduction.
- Superior Insulation: The injected polyurethane foam minimizes heat transfer, maintaining a comfortable indoor temperature year-round.
- Moisture Resistance: Polyurethane foam resists moisture, preventing condensation and mold growth inside the jambs.

Handles & Deadbolt Locks
Custom-designed exterior handles, expertly crafted to complement the strength and elegance of your door.
- Crafted from high-quality metals to ensure long-lasting durability and resistance to wear.
- Exterior handles are treated with protective coatings to withstand harsh weather conditions.
- Durable matching deadbolt comes pre-installed (for a Perfect Finish).
How to Measure Exterior
Accurate measurements are crucial when ordering a new iron door to guarantee a flawless fit. Our step-by-step guide makes measuring easy, helping you avoid installation issues. Whether you're replacing an existing door or installing a new one, follow these simple instructions to ensure the perfect fit for your pre-hung or slab iron door.
Tools You’ll Need:
- Measuring tape (preferably metal for precision)
- Paper and pen or phone (to note measurements)
- Ladder (if measuring a tall entryway)
- Level (to check alignment)
All doors from IronDoor.com come with a Pre-Welded Jamb ready for installation. No jamb assembly is required on-site, ensuring a precise fit and greater structural integrity.
* The door featured here is an 72" x 96" Openair 23 Double French Steel Door.
The recommended rough opening for this door is 73" x 96.5", allowing space for adjustments to ensure a precise fit. You typically want to make sure your rough opening is 1/2" taller and 1" wider than the door.
Conclusion
Properly measuring your door ensures a perfect fit and smoother installation. If you’re unsure about your measurements, consider hiring a professional or consulting with your door manufacturer. Iron doors are heavy and require precision, so it’s essential to get it right the first time!